
I have a habit of jamming H5P into projects. Mostly that’s because when it comes to elearning authoring tools, it’s my favourite. Overall it blends portability, ease-of-use, and functionality in a balanced way. For example, sure you can make an interactive video using Storyline, but H5P makes it much faster, simpler, and easily replicable. Unfortunately for some, H5P requires a home usually. This is often WordPress, Pressbooks, or sometimes it’s a plugin directly in your LMS (such as Moodle). In other posts I’ve shared methods for getting H5P into Canvas without WordPress (or Pressbooks). Around that time I’d also discovered some developers working on a method that allows H5P to Standalone and wrote up a demo, No CMS? No Problem. H5P Can Stand Alone. These posts covered a lot of applications I came across at the time.
One thing I did notice over the years was a lot of people in the Articulate Community asking about how to get H5P into RISE360. Some of the posts are 5+ years old already. The usual answer tends to be, embed H5P from another source, and that is actually an approach I used between 5 and 10 years ago. It’s pretty hideous because of the way iframes work, and overall the H5P doesn’t move around with the RISE package the same way as the other interactives in the course do (i.e. if you download the webpack or scorm pack from RISE360. One thing that would technically be possible to drop H5P into RISE in a more contained way would be to download the package from RISE, extract it, and manipulate the files directly to insert a custom H5P block (using the H5P StandAlone project), then packaging the whole thing up again and uploading to your LMS. That’s a tonne of work, and can break the package pretty easily (if you even have the skills to do that. I say in theory you can do it because I’ve never had the guts to try).
However, this year I learned about a plugin for RISE360 called Mighty by Maestro. Mighty is a browser extension that adds a bunch of functionality to RISE, from simplifying some custom edits, to adding additional blocks. From the little bit I’ve used it, it’s almost like they looked at the backlog of the feature request community forum and decided to build a plugin for those users. One of the new blocks Mighty provides is an HTML file upload. Basically, if you have a website created (simple HTML, CSS, Javascript) you can upload it directly to RISE360, via Mighty, as a block. Queue my interest in jamming H5P into projects. Recalling that Lumi Education has a single HTML file download option I tried downloading an H5P activity and uploading it to RISE. Turns out, the block requires you to upload a .zip folder with an index.html file in the root folder. Some good old fashioned website making then.
This lead me back to the H5P StandAlone project, which has gotten some fantastic updates this year. There’s a tonne of ways to make use of the StandAlone framework, and one of them will work for us to put an H5p activity into RISE360 as a block, without the annoying iframe and embedding stuff.
Before you start
So we will need a few things on hand before beginning:
- Some kind of text editor such as Sublime or Visual Studio Code
- The instructions and latest release (I used v 3.8.0) of the H5P StandAlone project
- We’re going to use the instructions for B) Downloading and Self-Hosting Files
- An H5P activity. Download it using the Reuse button from where ever you created it (if online) or just know where you saved it if you use Lumi Education Desktop Application
- A RISE360 course
- The Mighty plugin from Maestro (this is an additional cost to your Articulate license I know…I know…)
Setup
So the first thing I did was create a file folder to hold the whole project I was working on. It could be the activity name for example. Something you’ll know later.
Then following the instructions from the StandAlone project, create a subfolder called “assets”. After this, extract the downloaded StandAlone source code (that v 3.8.0 in my case). Then you get a folder with a readme and another folder called dist.

You have to copy that dist folder into your assets folder, then change the name from dist to something like h5p-player. You’ll need to know what you called this folder.
After this, get that H5P activity, right now it should have .h5p as the extension. Change the filename, and simply change .h5p to .zip. You’ll probably get a warning about that but we are doing this so we can extract the contents. Once it’s a .zip, extract it. We’re going to move that whole extracted folder into our project folder (in my case I called it quiz).

Create your index.html file
Now we need to do some typing. There is a great usage example in the StandAlone project documentation to follow. Using that, my simple HTML file looks like this:
<!DOCTYPE html>
<html lang="en">
<head>
    <meta charset="UTF-8">
    <meta name="viewport" content="width=device-width, initial-scale=1.0">
    <title>H5P Player</title>
</head>
<body>
    <div id="h5p-container"></div>

    <script type="text/javascript" src="assets/h5p-player/main.bundle.js" charset="UTF-8"></script>

    <script type="text/javascript">
        document.addEventListener('DOMContentLoaded', function () {
            const el = document.getElementById('h5p-container');
            const options = {
                h5pJsonPath: 'quiz',
                frameJs: 'assets/h5p-player/frame.bundle.js',
                frameCss: 'assets/h5p-player/h5p.css',
            };
            new H5PStandalone.H5P(el, options);
        });
    </script>
</body>
</html>
Notice that between the documentation and this sample that I changed “h5pJsonPath” to match the name of the folder my H5P content is in. So you need to name it whatever your H5P content folder is called.
Now I have an asset tree that should look something like this:
your-project/
├── assets/
│ └── h5p-player/
├── quiz/
│ └── [your H5P content files]
└── index.html
Make a package
Now that we have our three key ingredients: the StandAlone codebase (in h5p-player), the H5P code for the activity (in my case it’s in quiz), and our index.html file we can make a package to upload. Select the three key ingredients and zip them (I used Windows, so right click, “compress to” then “ZIP file”). If you have a webspace, you can FTP the unzipped file and folders there to test it out.
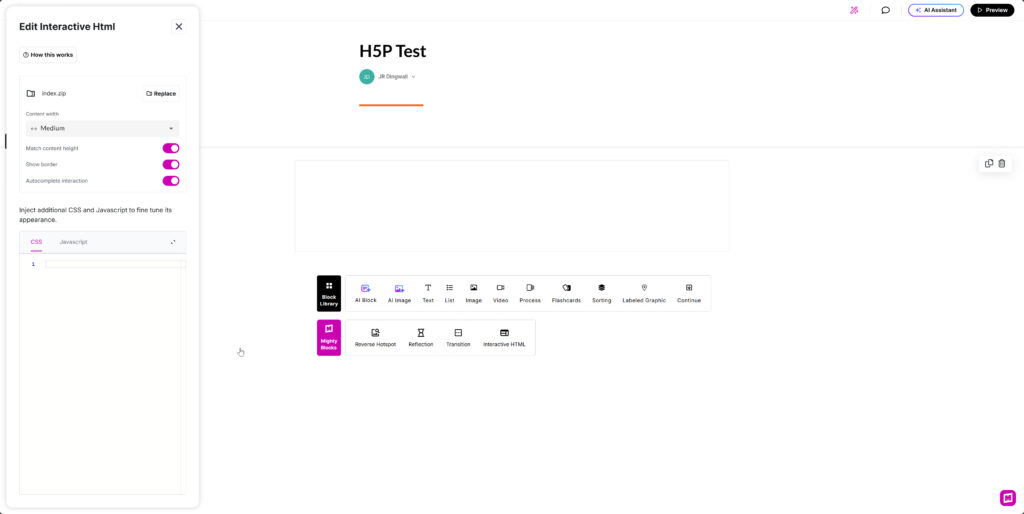
Upload to Mighty/RISE
So in your RISE course you can go to the lesson you want the activity to be a part of and use the Mighty plugin to insert Interactive HTML. You’ll need to click the little edit pencil and browse for the .zip you created. If you zipped your project folder instead of selecting the two subfolders and index file directly when compressing the project it won’t work.
The scary part of this is that it shows up blank. If you’ve used RISE a lot you will have noticed they block a lot of cross scripting which I think it what’s going on here.
Finish up and upload your RISE project somewhere
So for me to be able to see the end result I had to package up the RISE course. I downloaded it as a webpage and used FTP to upload it to my webspace. My next step will be dropping it into an LMS as a SCORM package, but I imagine at this point that will work. You can see the sample if you want to see the finished product.